Connect clusters with an agent
Install an agent to connect Redis Software and Redis Open Source clusters that Radar cannot reach directly.
| Redis Radar |
|---|
The Radar agent collects data from Redis deployments that Radar can't reach directly. You install it on a host inside your network, and it opens an outbound connection to Radar. Radar never needs inbound access to your network.
When to connect clusters with an agent
Use an agent for Redis Software and Redis Open Source deployments behind a firewall, in a private subnet, or on a segmented network.
The agent always connects to Radar over Transport Layer Security (TLS), using gRPC, and makes separate local connections to each Redis endpoint you configure.
Radar accepts those connections on its agent gRPC endpoint, which isn't enabled on every Radar deployment. Confirm the endpoint is available before you install an agent, and get its host and port from whoever administers your Radar deployment.
The agent runs in one of two modes. They differ in where your source credentials live.
| Mode | Radar holds source credentials | You maintain | Choose it when |
|---|---|---|---|
| Managed | Yes | Nothing on the host | You want to add and change sources from the Radar UI. |
| Static | No | A YAML file on the agent host | Source credentials must never leave the agent host. |
Trust a private certificate authority
If Radar presents a certificate from a public certificate authority (CA), certificate verification doesn't require any configuration. The agent verifies it against the host's system roots.
If Radar uses a private CA, point the agent at its certificate bundle instead: tls.ca_file in a static agent's configuration file, or --ca-file on radar-agent activate for a managed agent. The bundle you supply replaces the host's system roots rather than adding to them, so it must contain every certificate the agent needs to verify Radar.
Install the agent
Each Radar release publishes standalone agent tarballs, so a collector host runs the agent without running Radar itself.
Install the agent on a host that can reach both Radar and the Redis endpoints you want to collect from.
-
Get the tarball for your platform from the Redis Download Center, under Modules, tools and integrations.
Take the
radar-agent-fips-build only if you require Federal Information Processing Standards (FIPS) 140-3. It refuses to start unless FIPS 140-3 mode is active in its runtime.
-
Extract the archive and confirm the version.
tar -xzf radar-agent-<tag>-linux-amd64.tar.gz
cd radar-agent-<tag>-linux-amd64
./radar-agent version
The agent must report version
1.0.0or newer. Radar rejects anything older.
-
Create the
mcmservice identity the unit runs as.Skip this step if the host already runs Radar from the RPM, which creates
mcmfor you.sudo groupadd --system mcm sudo useradd --system --gid mcm --home-dir / --no-create-home \ --shell /sbin/nologin --comment "Radar service identity" mcm
-
Install the binary, the unit, and the environment file, then create the state directory.
sudo install -d -m 0755 /usr/libexec/mcm sudo install -o root -g root -m 0755 radar-agent /usr/libexec/mcm/radar-agent sudo install -d -o root -g mcm -m 0750 /etc/radar-agent sudo install -o root -g mcm -m 0640 systemd/radar-agent.env /etc/radar-agent/radar-agent.env sudo install -o root -g root -m 0644 systemd/radar-agent.service /usr/lib/systemd/system/ sudo install -d -o mcm -g mcm -m 0700 /var/lib/radar-agent sudo systemctl daemon-reload/var/lib/radar-agentholds runtime state. Create it now, because a managed agent writes to it during activation, before the service first starts. If you install the binary elsewhere, update the paths in the unit.
Run every agent command as the service identity, as sudo -u mcm /usr/libexec/mcm/radar-agent <command>.
Set up a managed agent
-
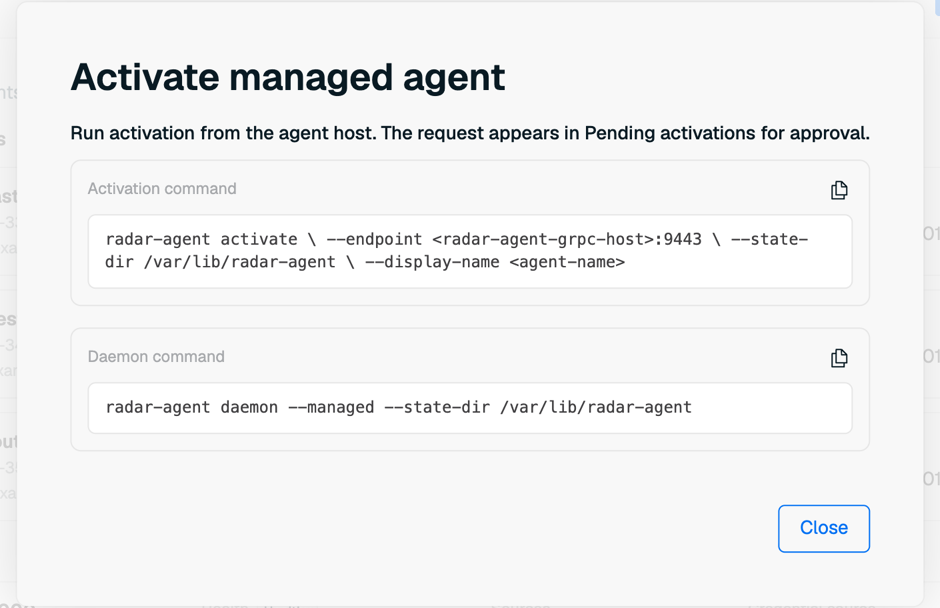
In Radar, go to Settings > Agents and select Activate managed agent.
Radar shows an activation command and a daemon command.
-
Copy the whole activation command from the dialog, then run it on the agent host as the service identity.
Keep every argument the dialog generated. On Redis Cloud, the dialog adds
--tenant-activation-id, a short-lived handle bound to your tenant, and the agent gRPC service rejects an activation that omits it. A self-managed install doesn't generate one.Replace the endpoint and the agent name. The endpoint is your deployment's public agent gRPC host and port. The dialog shows a placeholder, and the public port isn't necessarily
9443.sudo -u mcm /usr/libexec/mcm/radar-agent activate \ --endpoint <radar-agent-grpc-host>:<port> \ --state-dir /var/lib/radar-agent \ --display-name <agent-name> \ --tenant-activation-id <tenant-activation-id>When the dialog shows a Start before time, run the command before it. The command prints an activation code and waits for approval. You use that code to identify this host in Radar.
-
In Radar, find the request under Pending activations, confirm the activation code matches, and select Approve.
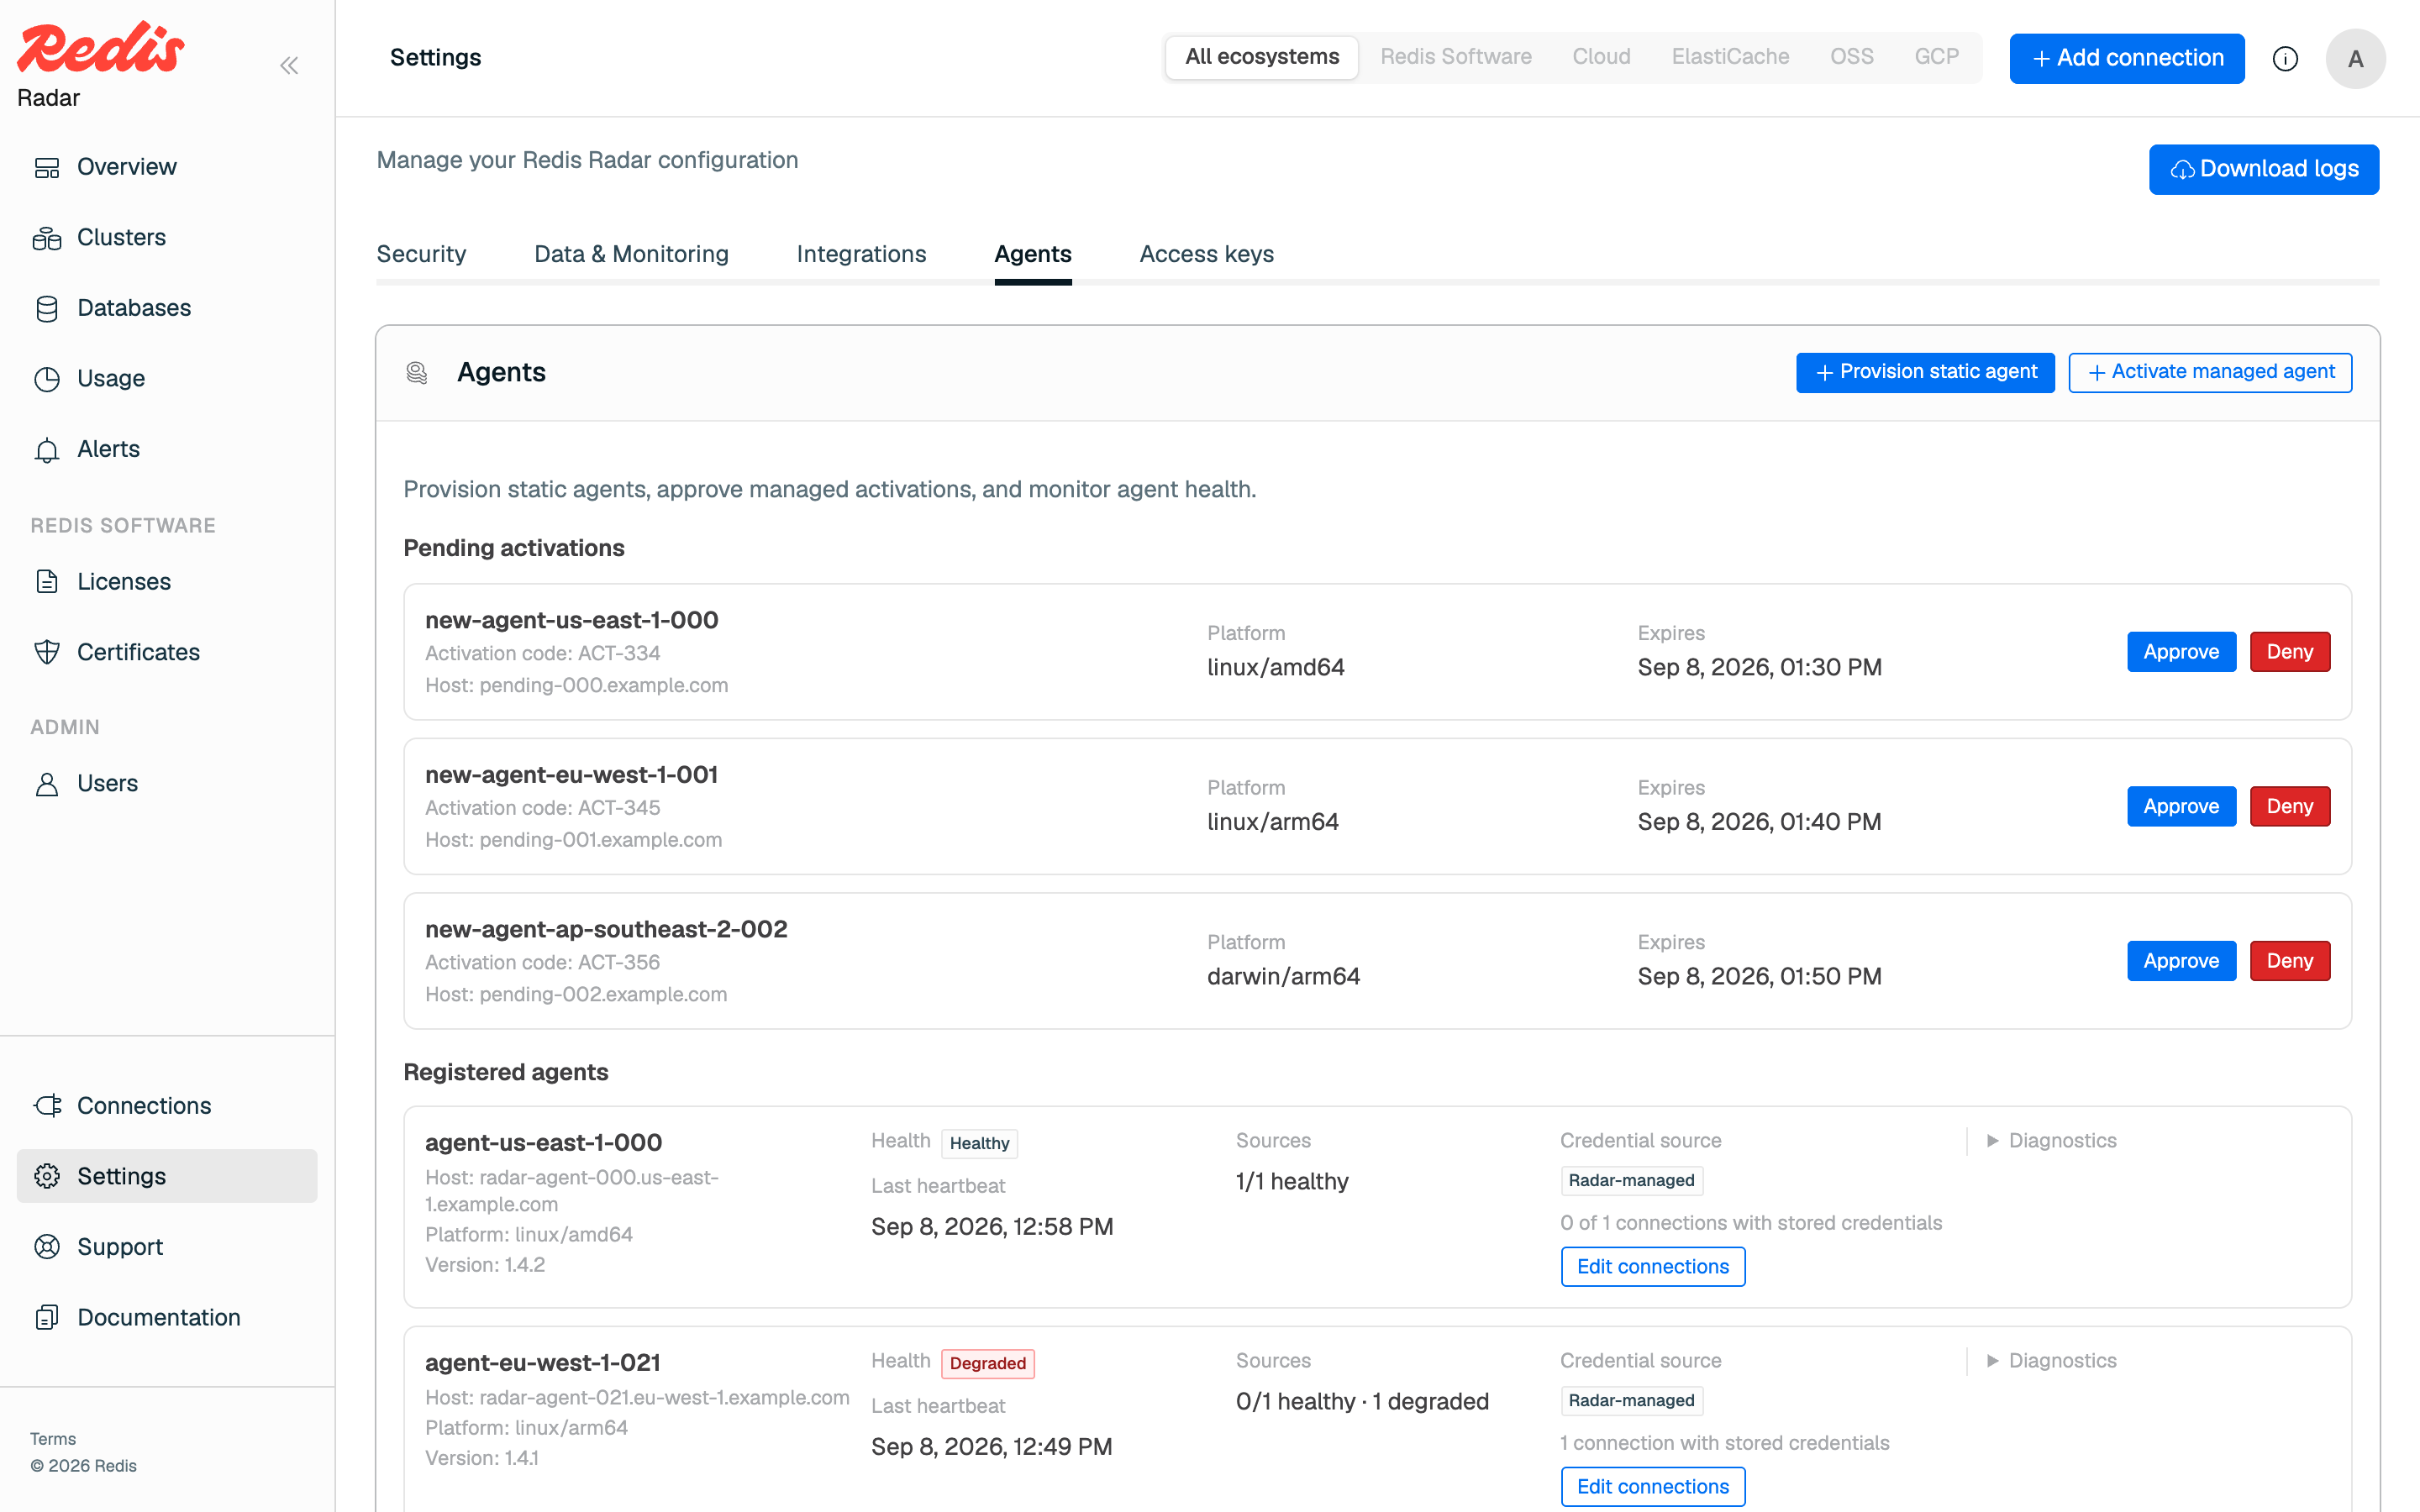
The activation expires 15 minutes after the command prints the code, so approve it while the command is still waiting.
-
Enter the Redis Software or Redis Open Source connection details in the approval form, then select Confirm approval.
Radar stores these credentials and sends them to the agent. Entering the details doesn't submit the approval; Confirm approval does.
Wait for the agent to print
Activation approved; managed credential stored.before you continue. The daemon needs that credential to start.
-
Set the daemon arguments and start the service.
Edit
/etc/radar-agent/radar-agent.envand replace the defaultRADAR_AGENT_DAEMON_ARGSline with:RADAR_AGENT_DAEMON_ARGS=--managed --state-dir /var/lib/radar-agent --metrics-addr 127.0.0.1:9090--metrics-addris optional. It exposes the agent's health and metrics endpoints on the address you give it.sudo systemctl enable --now radar-agent.service
To change an agent's sources later, go to Settings > Agents, find the agent under Registered agents, and select Edit connections.
/var/lib/radar-agent/agent-key.json. Keep that file readable only by its owner. The configuration cache Radar writes alongside it holds no secrets.Set up a static agent
-
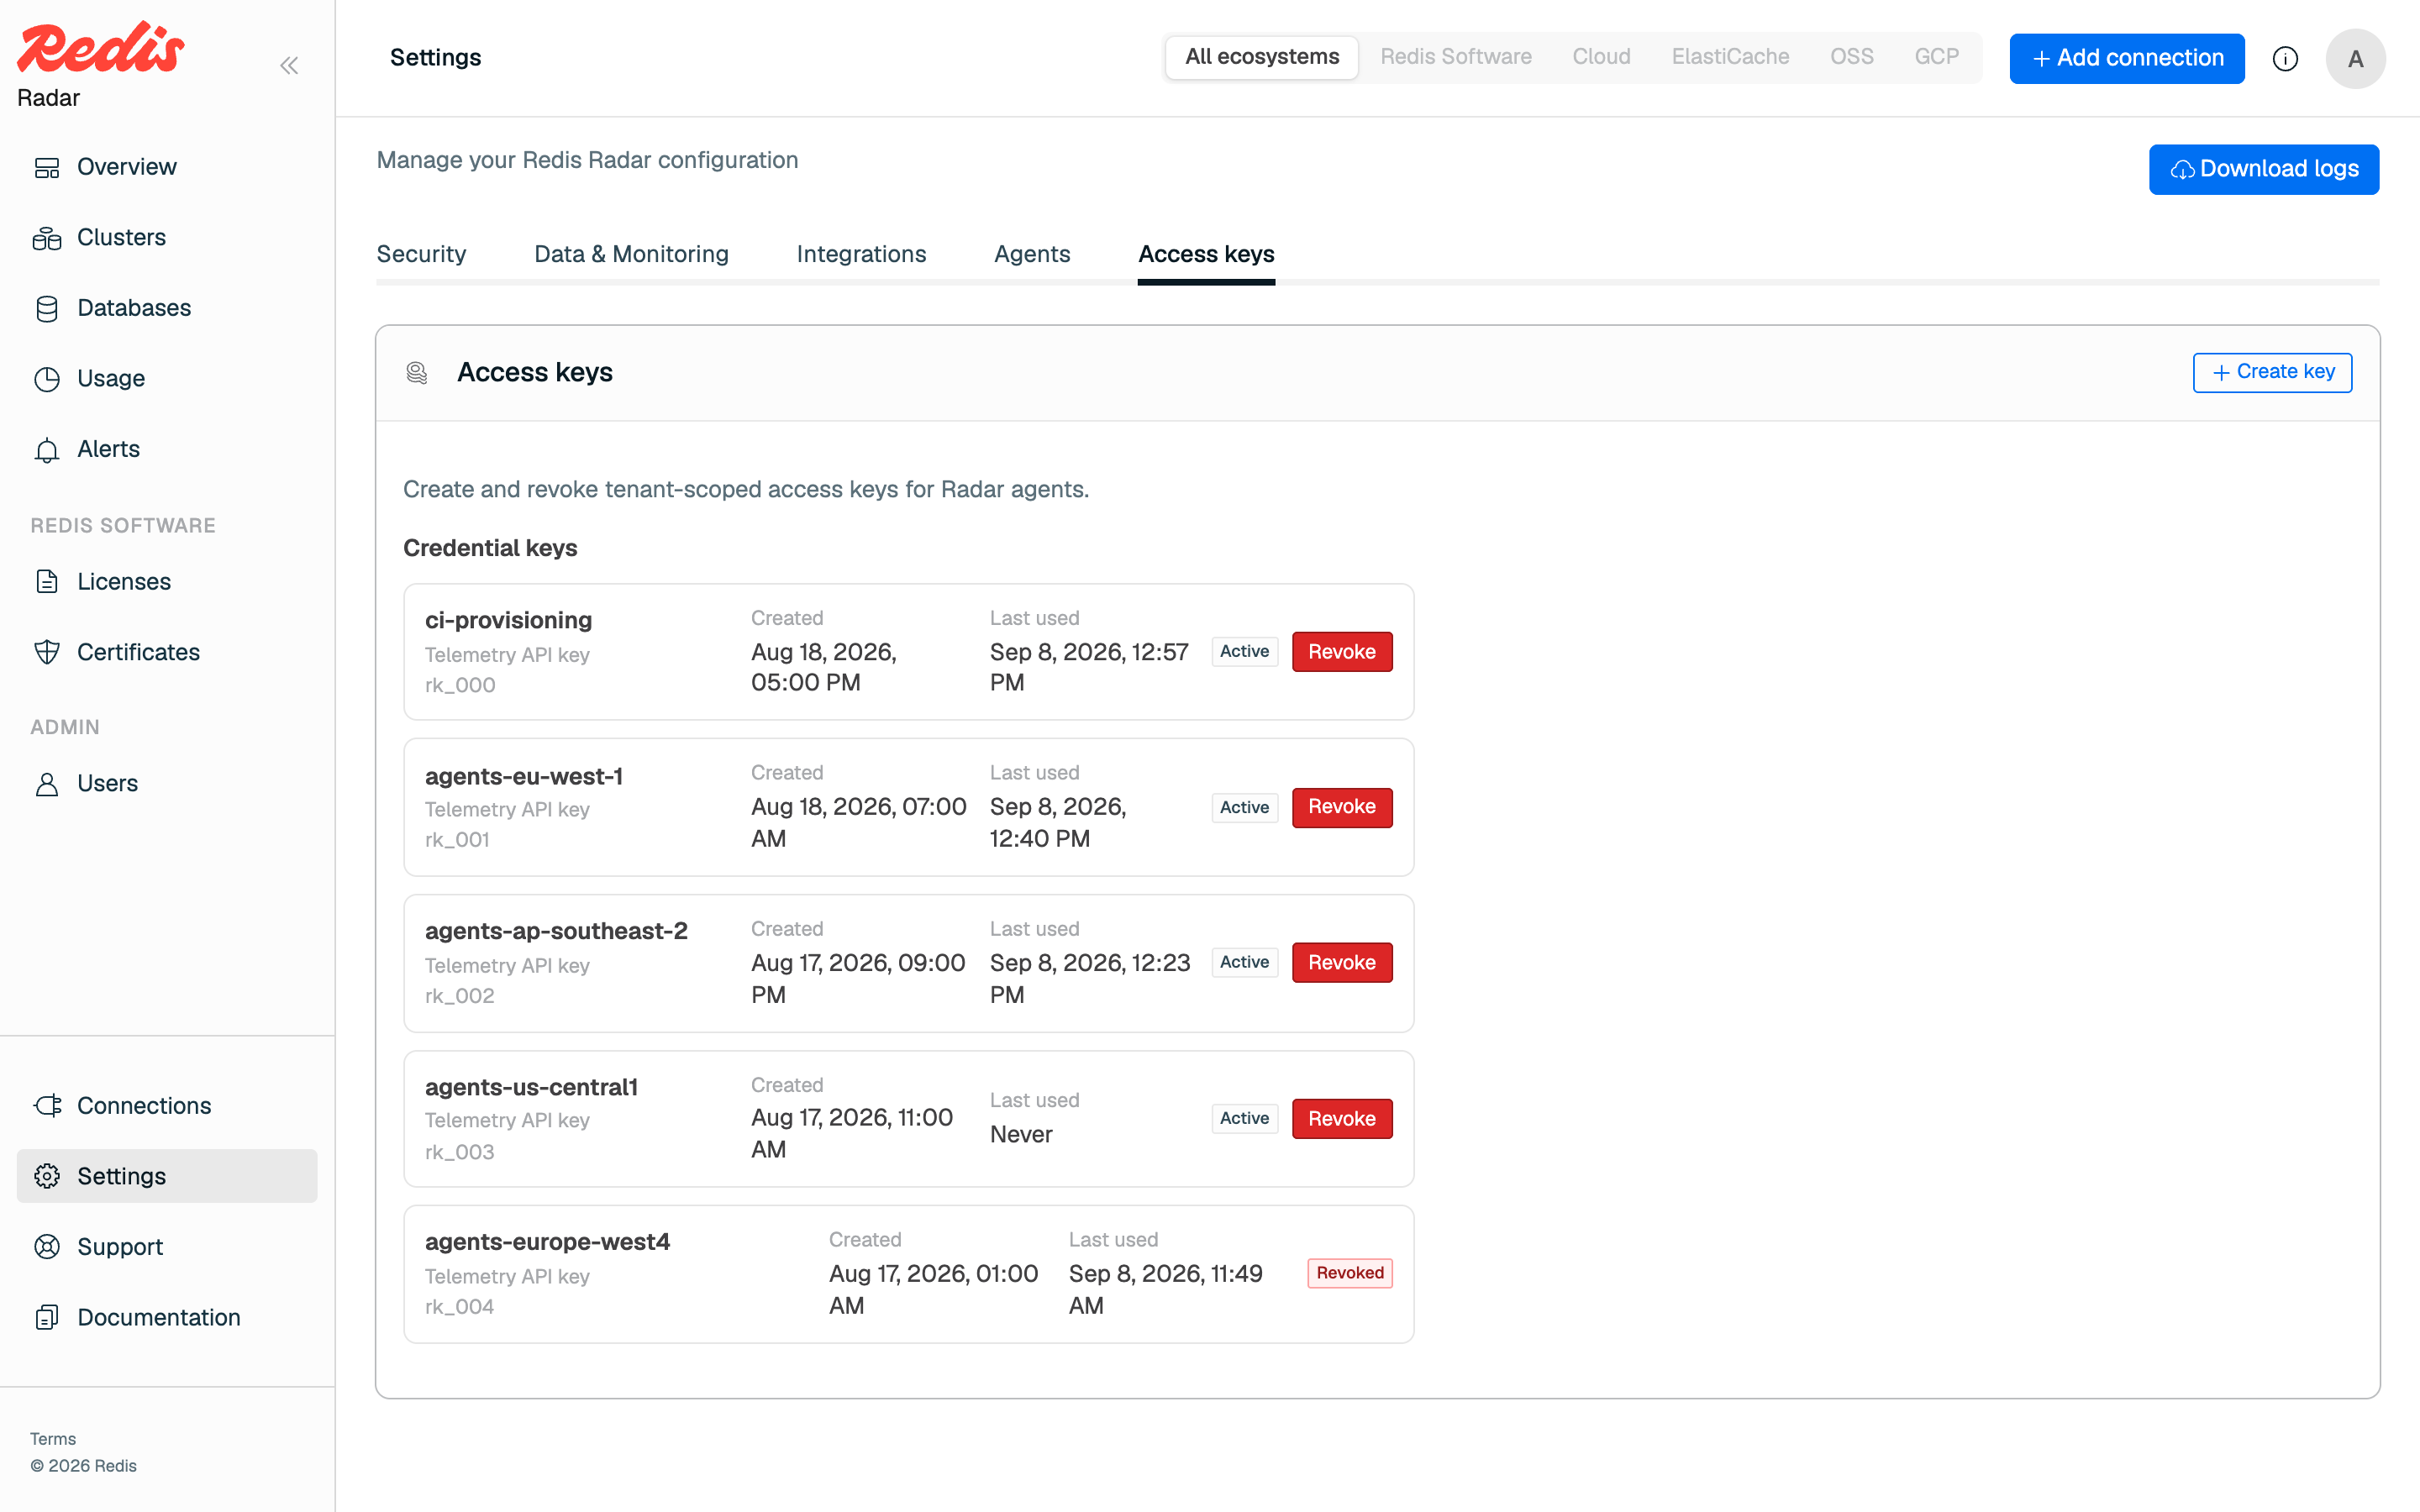
In Radar, go to Settings > Agents and select Provision static agent.
Radar returns an agent ID and a one-time access token in the form
<key_id>.<secret>. Copy both now, because Radar shows the token only once.Manage these tokens later under Settings > Access keys.
-
Generate one universally unique identifier (UUID) for each Redis source you plan to collect from.
uuidgen
-
Copy the example configuration from the archive, fill it in, and install it.
cp examples/static-agent.yaml config.yamlSet the agent ID, the token, and one UUID per source. See Configuration reference for every setting. Then install it with the ownership the service expects.
sudo install -o root -g mcm -m 0640 config.yaml /etc/radar-agent/config.yaml
-
Validate the configuration.
sudo -u mcm /usr/libexec/mcm/radar-agent validate --config /etc/radar-agent/config.yaml
-
Create the redaction salt.
The example configuration turns redaction on and reads the salt from
/var/lib/radar-agent/redaction-salt. The agent reads that file and doesn't create it, so generate it once before the first collection.sudo -u mcm sh -c 'umask 077 && openssl rand -hex 32 > /var/lib/radar-agent/redaction-salt'Keep the same salt across restarts and upgrades. A new salt changes what existing values redact to, so don't overwrite it if you repeat these steps.
-
Collect from every source and print a redacted summary without submitting to Radar.
sudo -u mcm /usr/libexec/mcm/radar-agent dry-run --config /etc/radar-agent/config.yaml
-
Submit one collection to confirm the connection to Radar works.
sudo -u mcm /usr/libexec/mcm/radar-agent once --config /etc/radar-agent/config.yamlRadar creates each source the first time it receives data from that source, and uses your
namevalue as the display label when that value is valid.
-
Start the service.
The default
RADAR_AGENT_DAEMON_ARGSin/etc/radar-agent/radar-agent.envalready points at/etc/radar-agent/config.yaml. To expose health and metrics, add--metrics-addr 127.0.0.1:9090to that line.sudo systemctl enable --now radar-agent.service
Configuration reference
Static mode uses a single YAML file. Managed mode doesn't.
| Setting | Description |
|---|---|
agent.id |
The agent ID Radar returned when you provisioned the agent. It must match the identity bound to the token, or Radar denies every submission. |
agent.version |
Optional. Defaults to the version of the installed binary. |
radar.endpoint |
The Radar agent endpoint, as host:port. |
radar.agent_key |
The one-time token, as <key_id>.<secret>. |
radar.tls.ca_file |
Optional. A PEM bundle used to verify Radar's certificate, replacing the host's system roots. |
radar.tls.server_name |
Optional. Overrides the certificate name the agent verifies. |
redaction.enabled |
Whether the agent redacts values in the payloads it submits. Enabled by default. |
redaction.salt_file |
The salt file the agent uses so a given value redacts to the same result on every collection. |
collection.interval |
How often the agent collects when running as a daemon. |
collection.timeout |
How long a single collection can run. |
sources[].id |
The UUID you generated for this source. |
sources[].name |
A name for the source. Radar uses it as the display label. |
sources[].type |
Either redis_enterprise for Redis Software or redis_oss for Redis Open Source. |
A redis_enterprise source takes base_url, username, and password. To collect from a cluster running an older Redis Software version, set old_version_compatibility.enabled to true.
A redis_oss source takes host, port, and password. Set username only if you connect as an access control list (ACL) user.
Each source type takes a different TLS setting: tls.skip_verify for a redis_enterprise source, and tls.enabled for a redis_oss source. Neither one affects the agent's connection to Radar, which radar.tls controls.
To keep secrets out of the file, reference environment variables instead of literal values.
Collect from an isolated network
When the agent host can't reach Radar at all, collect and submit in two steps from different hosts. Install the agent on both hosts, and give each one only the configuration it needs. export requires your source credentials and no Radar token, and submit-export requires the Radar endpoint and token and no sources. Use the same agent.id in both files.
This keeps your source credentials on the collector, which is the custody benefit static mode exists for.
On the collector, the sources and the redaction salt:
agent:
  id: "<agent-id>"

redaction:
  enabled: true
  salt_file: "/var/lib/radar-agent/redaction-salt"

sources:
  - id: "<source-uuid>"
    name: "<source-name>"
    type: redis_enterprise
    base_url: "https://<cluster-host>:9443"
    username: "<username>"
    password: "<password>"
On the submission host, the Radar endpoint and token:
agent:
  id: "<agent-id>"

radar:
  endpoint: "<radar-agent-grpc-host>:<port>"
  agent_key: "<key-id>.<secret>"
-
On the host that can reach your Redis sources, collect to a file.
sudo -u mcm /usr/libexec/mcm/radar-agent export --config /etc/radar-agent/config.yaml --output telemetry.json
-
Move the file to a host that can reach Radar, then submit it.
sudo -u mcm /usr/libexec/mcm/radar-agent submit-export --config /etc/radar-agent/config.yaml --input telemetry.json
The exported file holds sanitized telemetry only. It never contains your Radar token or your source credentials. Each configuration file does hold secrets for its own half, so protect both hosts.
Monitor and secure the agent
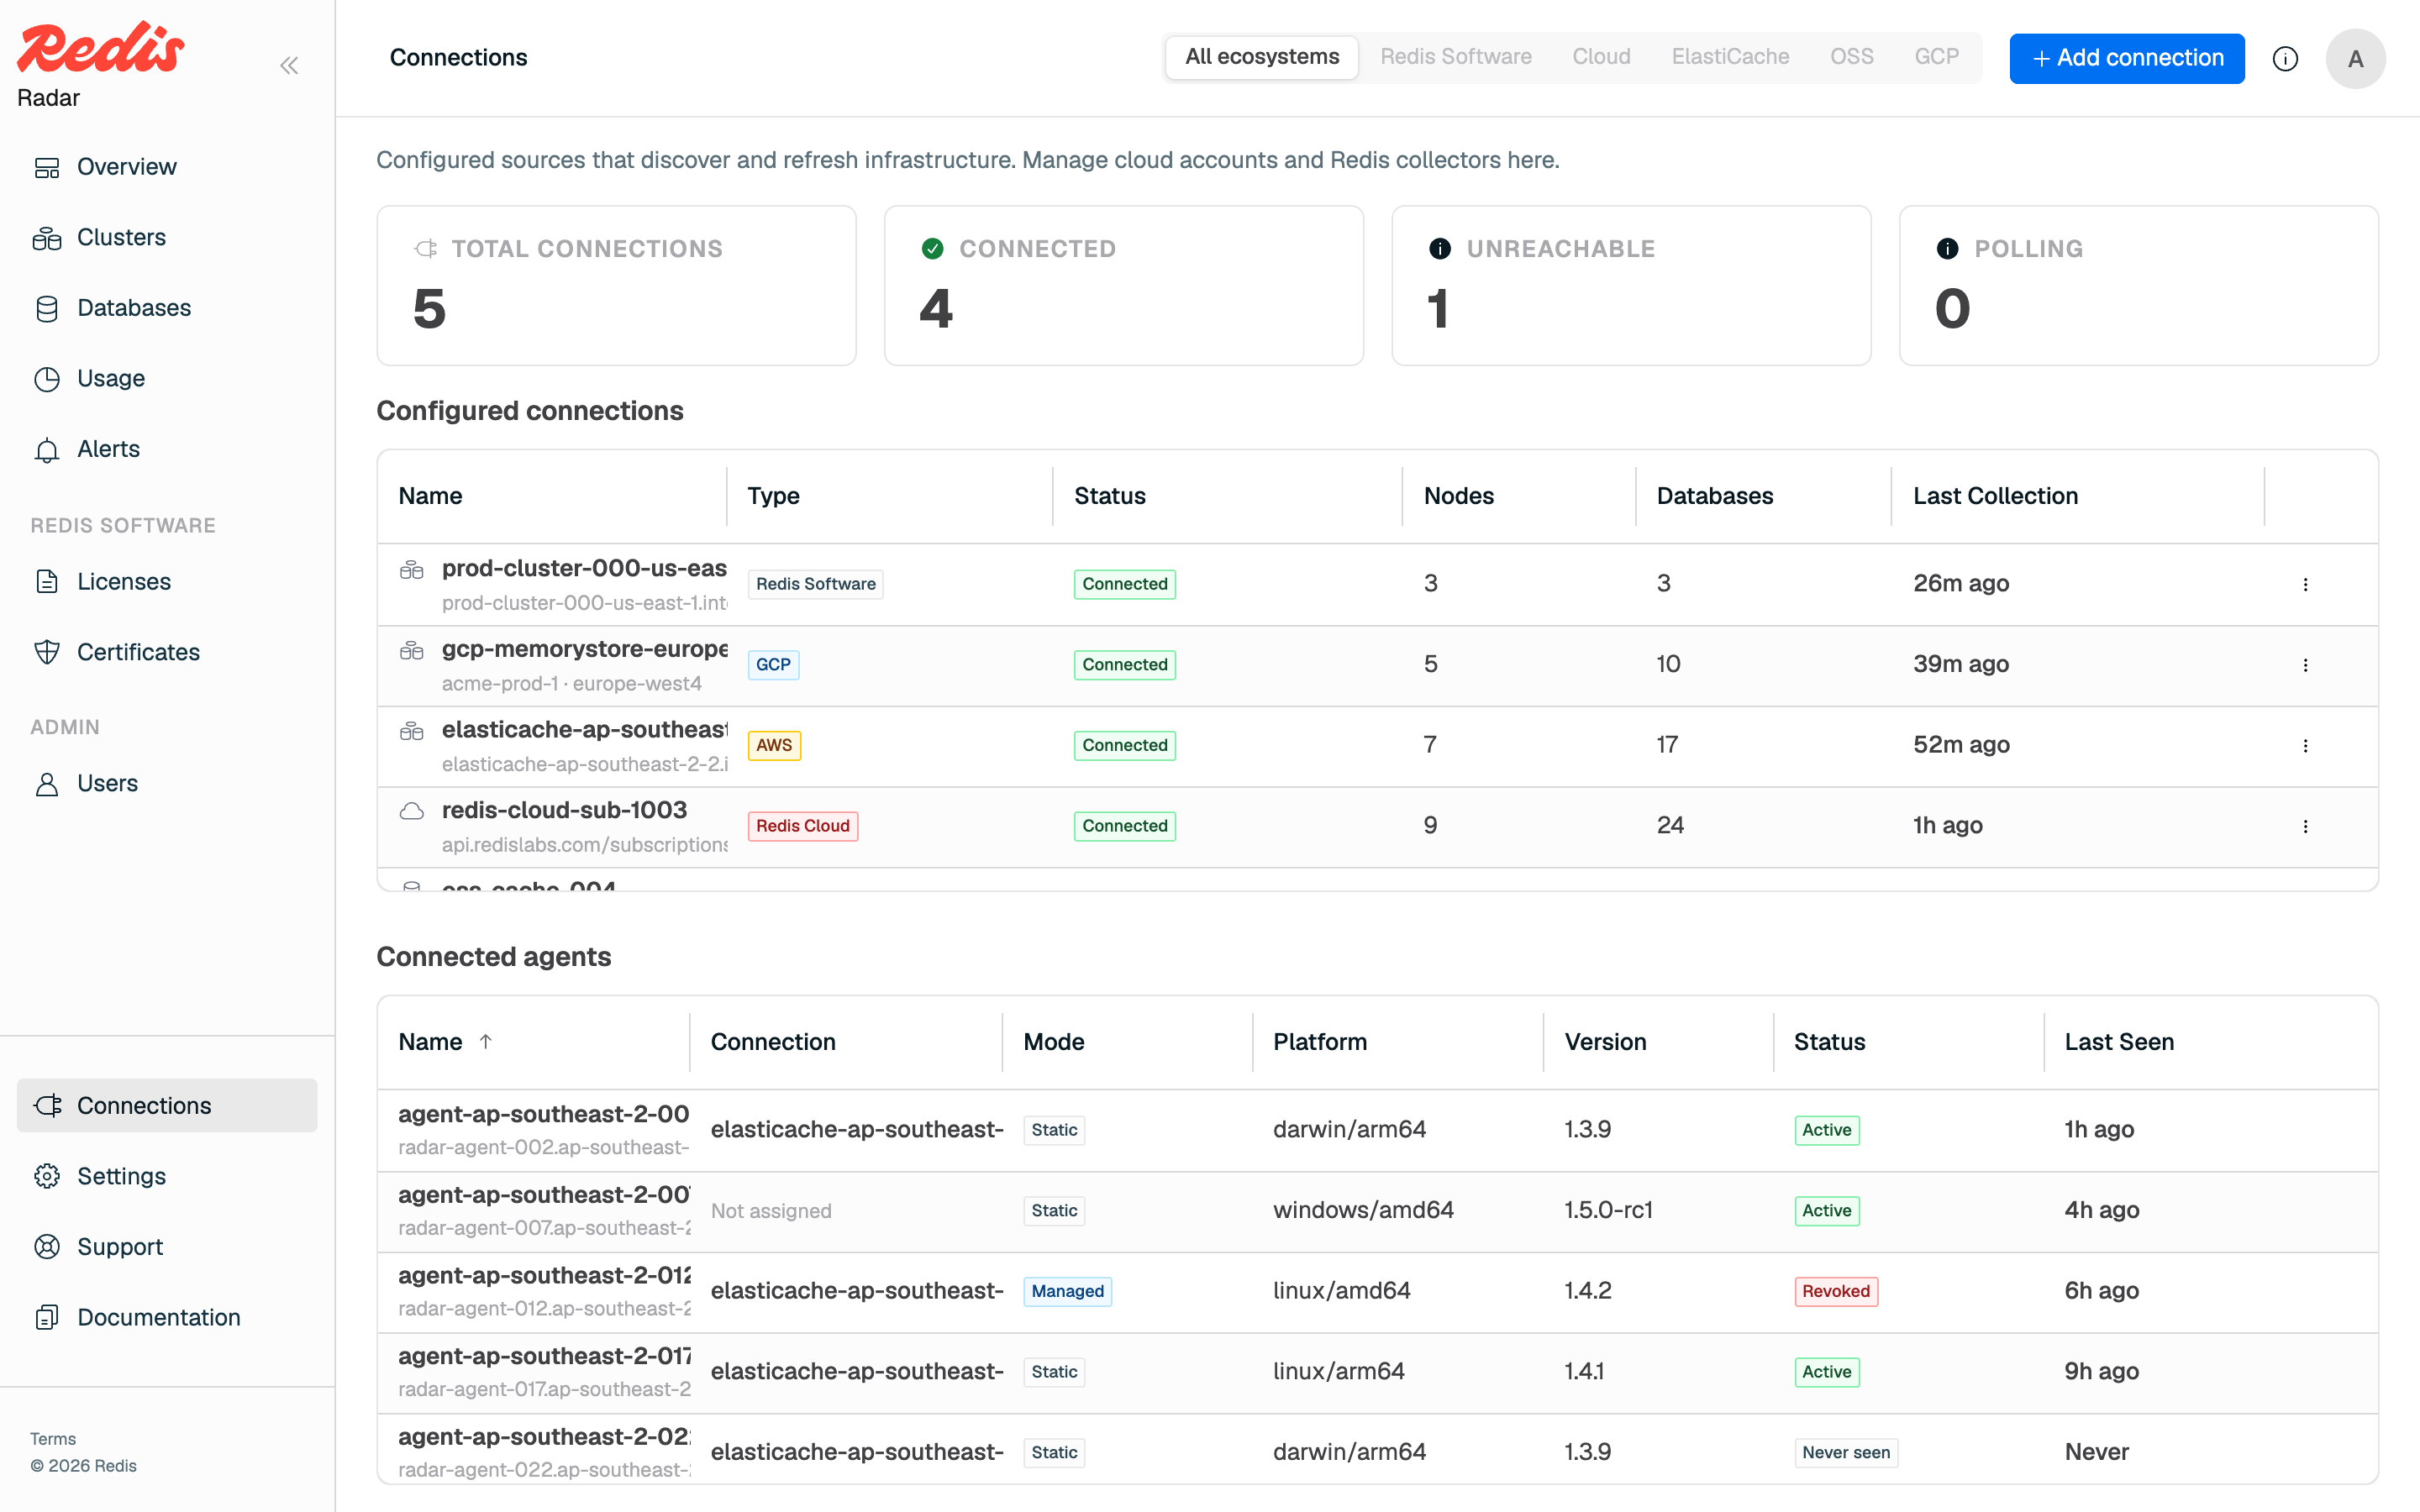
Every agent appears in Radar under Settings > Agents and in the Connected agents list on the Connections page. Radar shows each agent's mode, platform, version, and last heartbeat, along with the combined health of the sources it collects from.
To expose health and metrics endpoints on the agent host, pass --metrics-addr when you start the daemon:
GET /healthzreturns a health snapshot:200when the agent is healthy,503when a source is failing.GET /metricsreturns per-source collection, submission, and failure counters in Prometheus format.
--metrics-addr 127.0.0.1:9090, or put a firewall in front of them.The daemon writes a local health snapshot only when you start it with --health-file, and the health command needs that same path. Add --health-file /var/lib/radar-agent/health.json to RADAR_AGENT_DAEMON_ARGS in /etc/radar-agent/radar-agent.env, restart the service, then read it:
sudo -u mcm /usr/libexec/mcm/radar-agent health --health-file /var/lib/radar-agent/health.json
--metrics-addr serves health over HTTP but doesn't write this file. Use journalctl for the agent's logs and systemctl to restart the service.
Both /etc/radar-agent/config.yaml and /var/lib/radar-agent/agent-key.json hold secrets, so restrict them to their owner. Never set tls.insecure_skip_verify outside local development, because it turns off certificate verification. To block an agent, revoke its key under Settings > Access keys. Revoking takes effect centrally, and the agent can no longer connect.
Source passwords and the agent's token are redacted from logs, diagnostics, health output, error messages, and export bundles.
Upgrade or remove the agent
To upgrade, get the new tarball, verify it, and replace the binary in place. Your configuration and environment file are untouched. If you run a static agent whose configuration file holds both source and Radar credentials, revalidate it before restarting:
sudo -u mcm /usr/libexec/mcm/radar-agent validate --config /etc/radar-agent/config.yaml
sudo systemctl restart radar-agent.service
Keep /etc/radar-agent and /var/lib/radar-agent in place, because the agent needs its state to stay registered.
Radar enforces a version policy on every request. An agent older than the minimum supported version is rejected until you upgrade it. An agent newer than the Radar deployment supports is also rejected, and Radar asks for a server upgrade instead.
If Radar's database is reset, activate the managed agent again. Stop the service before you clear the managed registration state. Recreate the state directory if you removed it, because /var/lib is owned by root and mcm can't create the directory during activation.
sudo systemctl stop radar-agent.service
sudo rm -rf /var/lib/radar-agent
sudo install -d -o mcm -g mcm -m 0700 /var/lib/radar-agent
Then repeat Set up a managed agent and start the service again. On Redis Cloud, get a fresh tenant activation handle from the dialog first.
To stop collecting from this host, turn off the service and delete its configuration and state.
sudo systemctl disable --now radar-agent.service
sudo rm -rf /etc/radar-agent /var/lib/radar-agent
Then delete /usr/libexec/mcm/radar-agent and /usr/lib/systemd/system/radar-agent.service, and revoke the agent's key in Radar under Settings > Access keys.
Next steps
After the agent reports its first collection, its sources appear alongside your other clusters. See Monitor your fleet.